| I had a friend who was trying
to get rid of a 1997 Explorer disc brake rearend. It had 4.10 gears and
a limited slip. I said, "I'll take it!" And for the price I got it for
($450) who wouldn't?
Well time dragged on and I finally decided
that it was time to plant this pumpkin. I checked out the axles, brakes,
clutches and gears. Everything looked good. I had to buy and install new
C-clips but it was very simple. Note: Do not turn axle shaft without the
pinion shaft in the differential or you will spend the next 45 minutes
trying to get the damn side gears back into position.
I made a couple of modifications to the
brake lines so that I could use my braided steel brake line that was already
in place. The '92 has the junction block at the centre of the rear differential
housing. A '97 has the junction block on the left hand side. The hose from
the frame, junction block and left hand caliper hose is all one piece.
I used two right hand side caliper hoses. On the left hand side I drilled
new holes for the bolt and alignment tab. The bolt is self tapping. I then
bent up some new hardlines from the centre mounted junction block and ran
them to the caliper hoses.
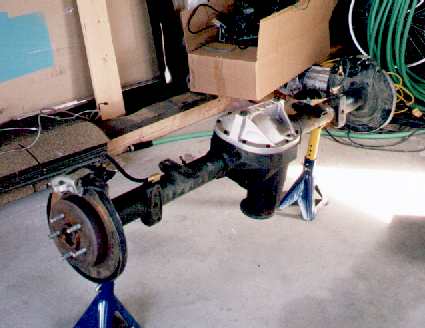
I installed an SVO axle girdle. I believe
that it is the T/A girdle with SVO cast into the cover. While I had the
cover off, I installed a stud kit for the bearing caps. The studs were
easy to install but it would have been easier to torque the nuts if I had
a friend there to keep the rearend from falling off the jackstands. I managed
to do it without dropping the rearend. The girdle was very easy to install
and is very pretty compared to the dirty old steel cover. I simply followed
the instructions that came with it.
Remove:
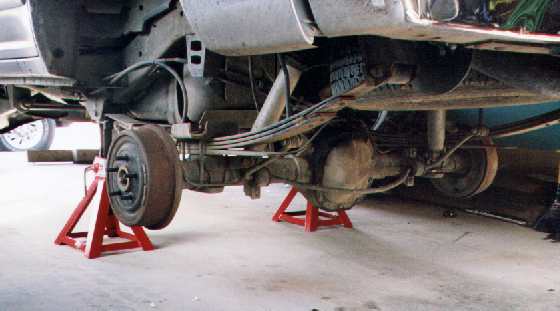
So now everything was ready to go. I blocked
the front wheels and raised the truck on jackstands. After removing both
tires, I removed the spare tire, while I was in there I removed the spare
tire hanger. I then disconnected the rear swaybar and tied it up to the
frame to get it out of the way. Next I disconnected the rear parking brake
cables from the equalizer and pulled them out of the mount so they were
free. Then I disconnected the rear driveshaft from the pinion flange and
unplugged the rear Anti-lock connector. Now I loosened off the U-bolts.
I did not disconnect the brake hardlines from junction block until I was
just about to drop the rearend all the way to the floor. This was to keep
the brake fluid from dripping everywhere, as much as possible. I put the
hose and junction block on top of the frame to keep it out of the way.
Next I supported the rearend with my floor jack and removed the U-bolts.
I lowered the jack and dragged the rearend out from underneath.
Intermission:
Now I stopped to have a Coke and some Popcorn
Twists.
Replace:
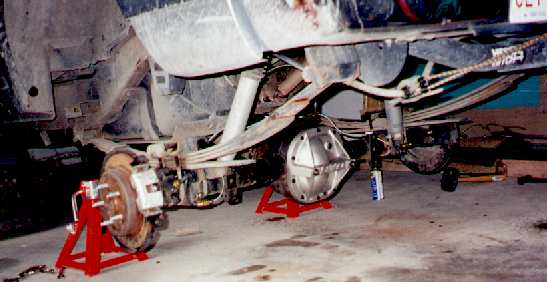
Installing the new axle was just as easy.
I had a minor interference problem with the bolts for the caliper hoses
and the Superlift spring perches. I solved this by installing a couple
of flat washers on the bolts so they would not extend so far into the original
spring perch. I jacked up the axle and aligned the Superlift spring perch
as I went. Once the axle was in place I installed the U-bolts and aligned
everything before tightening them. Next I bolted the junction block onto
the differential housing and connected the new hardlines. I then reconnected
the rear Anti-lock connector. The next item was reattaching the rear driveshaft.
I then ran the new parking brake lines through the frame mount. I had to
get a new parking brake intermediate cable because they are different lengths
from '92 to '97. There are also two small clips that are required to hold
the parking brake cables in the correct position on the rearend. The last
thing was to reconnect the rear swaybar. OK second to last. The real last
thing was to bleed the brakes.
Test Drive:
I put the tires back on and lowered the
truck back onto the ground. First I drove slowly down the alley to make
sure everything was working. I checked for any leaks and then went for
a real test drive. The improved stopping power of the rear disk brakes
was impressive. There was a rubbing noise coming from the rear. I stopped
and looked underneath. Nothing external was rubbing. I returned home and
pulled the wheels off again. I then removed the rotors. There were a few
small rub marks on the backing plates on both sides. Since the rearend
was used, the backing plates had become dented and the rotors were rubbing
on a couple of spots. It was nothing dangerous, just noisy and annoying.
I used a 12oz "Wrench, General Purpose"(tm) to flatten out the high spots
and went for a test drive again. The noise was gone.
Parts List:
Ford Parts:
Right hand side rear brake hose P/N F57Z-2282-B
(two required) I will have to look for the part numbers for the Parking
Brake cables and will add them later. Parking Brake intermediate cable
P/N F5TZ-2A793-B
SVO 8.8 Axle Girdle P/N M-4033-G
SVO 8.8 bearing cap stud kit P/N M-4034-A
Misc Parts:
3/16 Brake line
tubing cutter
double flaring tool
General Notes:
My truck is spring-over using the Superlift
spring perches. There are a few more steps required if your rear axle is
on top of the spring. I did not have to disconnect my rear shocks, you
may have to. Also a helper is definitely needed to lift the rearend off
of both rear springs at the same time if your axle is in the stock position.
This swap took me about 3 1/2 - 4 hours
to do by myself, I took a lot of breaks between steps and it was a nice
day so I wasn't in any hurry. I figure that the whole thing could quite
easily be done in about 2 -2 1/2 hours by two people.
Remember to check and double check everything
to make sure all fasteners are torqued to spec. Be sure that you bleed
the brakes and refill the master cylinder. Do not cut any corners with
brakes and suspension. Your life and the lives of your passengers depend
on it.
|

